Saturday, December 21, 2013

Maybe Christmas Doesn't Come from a Store...

"It came without ribbons.  It came without tags.  It came without packages, boxes, or bags.  Maybe Christmas doesn't come from a store. Maybe Christmas, perhaps, means a little bit more."


This season, social media has been full of so many people questioning Santa.  If your kids believe in Santa are you lying to them?  Are you teaching them to be greedy? Are you forgetting the true meaning of Christmas?  Is it really fair to the kids? People, please!  Your killing me! 

My parents are the greatest at Christmas. Still, to this very day.  My brother and I literally believed in Santa until we were 13.  My parents were just that good.  Jake got a bell from Santa's sleigh before The Polar Express was even cool.  My mom made teeth marks in carrots so we knew Rudolph enjoyed his snack.   Jake tried to "catch" Santa every year, setting up traps and cameras in our living room.  One year he put our video camera on the kitchen counter and aimed it at the tree, knowing he was going to get him.  After working the midnight shift, my dad got up, put trash bags over all the windows to make it look like night, dressed up as Santa, delivered some presents, pretended to notice the camera and ran over to turn it off.  That tiny glimpse of the man in the red suit in our living room was enough.

  And guess what?  We are fine.  We are both productive members of society.  Our childhood was amazing, even with Santa, the Easter Bunny, and the Tooth Fairy ( gasp!).

We still went to church on Christmas Eve and sang Happy Birthday Jesus as a family in my grandmas basement every single year.  We give and donate and volunteer.  We aren't greedy or jaded or feel like our parents lied to us all those years.  Because to us, Santa is real.  He is the spirit of all that is good and right in the world.  He is magic and wonder and charity. 

So it was only appropriate that Santa bring us the best gift of 2013.  News that 19 weeks in, we still have a healthy baby, and that little baby is a girl!


 As you can see, Jaslyn is thrilled. 

For the record, I was 150% convinced this one was a boy.  So if your pregnant in the future, and I say " I think its a boy/girl" you can pretty much bet on it being the exact opposite of whatever I believe.

 Our ultrasound went well, the baby was very active and much more cooperative than big sister was for her ultrasounds.  All baby's organs look good and my placenta and fluid levels are normal.  The IUD is still visible but is being pushed farther and farther into the uterus as the baby grows.  This may cause another complication towards the end of my pregnancy if the IUD becomes imbedded in the uterus and they cant retrieve it when the baby is born.  But we will cross that bridge when we get there.  We go back again on Dec 30th and will hopefully discuss delivery options, as I want another natural birth and the IUD may present complications at delivery. 

Another girl means Jeremy will officially be outnumbered 5 to 1 (our cats Hattie and Harriett are both girls).  He said he is getting a male dog, but I'm holding out for baby #3 in a few years.  :)


Now to pick a name.  Hopefully it's easier than it was with Jaslyn who was nameless until we signed the birth certificate. 
 
Merry Christmas and Happy Everything from our family to yours!


Friday, December 6, 2013

No News is Good News

Another visit to the OB this week and another positive report.  No change.   At the 16 week mark, BW2 was active, as always, with a HR of 134.  So far it looks like the IUD is not causing any new problems.  All of the additional testing they did due to my high blood pressure readings turned out normal, and it looks like my BP has returned to normal.  Maybe just all the stress? 

Our next appointment for an ultrasound and lab work is the 17th.  This will be a focused ultrasound to look at the baby's anatomy and give us a better idea of where the IUD is and if it remains stable.  If this baby cooperates, we should be able to find out the gender!  Baby Jaslyn was not so participative, and we had to wait 20+ weeks to find out she might be a girl.  Our doctor asked "Would you like to find out the gender or wait for a 40 week surprise?" which he immediately followed up with "You've probably had enough surprises for this pregnancy."  I think he is right!  We are definitely leaning towards this little one being a boy.

The new medications have significantly improved the nausea I was having which is awesome.  I've yet to feel my energy return with the second trimester, but I'm still holding out for a miracle.  I would be perfectly content to eat Vanilla Cupcake Goldfish and sleep all day, but I guess I have to work, and graduate, and cuddle Jazzy Bear.  It could be worse :)  When we ask Jaslyn to "give the baby a kiss" she kisses my belly, which absolutely makes you melt.  The only downside is she doesn't differentiate my baby belly from anyone else's--when we tell her to give the baby a kiss she heads for the nearest belly- daddy's, Mimi's, Grandad's.  She likes to share the love ;)

Tuesday, November 12, 2013

BW2 Update

We had a quick check in with the nurses at my doctor's office today to make sure everything is going ok.  I'm happy to report that BW2 is still looking great.  My fluid levels are stable, placenta looks good, and the baby was moving everywhere.  I had some testing done due to the high BP readings at my last appointment, but thankfully they all look good at this time.  We will see the doctor again on Dec 1st and will hopefully know what the baby's gender is in time for a Christmas surprise!  Thanks to everyone for the well wishes!  We are still being very cautious due to the circumstances but are more excited for this new life with each passing day!

Friday, November 1, 2013

Baby Wooten #2

And just like that....BAM! Baby #2 is on the way. 


No, this is not a Halloween trick!  And yes we are as shocked as you are!  Good lord willing and the creek don't rise, Baby #2 will be making his/her appearance around the middle of May. 

So not considering that we have a 10 month old, I work way too much, and I graduate with my doctorate right around my due date, we are really excited! 

 
Jaslyn is probably less excited, but right now her main concerns in life are kittens, pumpkins, and snacks so we are pretending like she is as excited as the rest of us!

I decided to blog about this baby because as you may have guessed by now, BW2 has came with some very special circumstances.  I thought writing about them here and periodically updating about the baby's status would be the easiest way to make sure all our out of town family and friends stay in the loop.  Right now we need all the prayers and happy thoughts we can get for this little peanut!

I am currently between 12-13 weeks pregnant.  We aren't sure of my exact dates because the baby was unexpected.  A few weeks ago, I was feeling really poorly and basically wanting to sleep all the time.  My mother (who honest to goodness knows everything, I swear) kept asking if I was pregnant.  My answer was "No! Of course not!" because I have a Paragaurd IUD.  An IUD is a birth control device that is placed in the cervix to protect against pregnancy without hormones. 


Paraguard looks like this.  According to the manufacture and general contraceptive teaching, IUD's are the MOST EFFECTIVE form of reversible contraception.  More effective than pills, patches, shots, ect... A copper IUD like Paragaurd is good for preventing pregnancy for up to 12 years.  The pregnancy rate with Paragaurd is less than 0.01%.  In comparison, the pregnancy rate with tubal ligation is up to 3.7%.  Even if pregnancy occurs, they are often in the fallopian tubes or are non-viable.  But I digress...
 
So fast forward to when my mom finally convinces me to take a test, which is positive, but a pregnancy is impossible because I have this very very effective form of birth control.  I go to my OB, who also thinks the test was likely a false positive or maybe I have a tubal pregnancy.  We immediately go for an ultrasound which reveals....
 
 
One healthy, viable, 10 week old fetus.  Say what?!?!
 
Since my doctor has never had this happen to a patient, we did not really know what to expect.  I went to WVU to see a high risk perinatologist, who tried to remove the IUD but was unsuccessful.  Somewhere in the course of 3-4 days the IUD had moved from my cervix to the top of my uterus, above the baby.  And that is where it will stay for the remainder of the pregnancy. 
 
So what does all this hoopla mean for us?  First of all, I am high risk which means more frequent monitoring and trips to the doctor.  So far every ultrasound and exam has showed a healthy growing baby.  Glory be to God. 
 
It also means I am having some unwanted complications and my risk of second trimester miscarriage is higher than other pregnancies.  I am on light activity and generally don't feel as great as I did with Jaslyn.  I have had a couple of big scares but my doctor has been very attentive and reassuring. He has described this pregnancy as a "miracle" and "meant to be".   The IUD is causing me to have some intermittent pain that is pretty severe but not threatening to the baby.  Most recently, I was diagnosed with pregnancy induced hypertension.  In light of that I am having some more testing done next week to determine how we can treat it to keep me and the baby safe for the next 6 months.  Early delivery is more common in women who carry babies with IUD's so that is always in the back of our minds.  The perinatologist at WVU has assured us that while the IUD does make the pregnancy more complicated the actual device does not pose any risk to the baby while in utero.  If I have a natural birth the IUD should be delivered with the baby.  He said he has literally seen babies born holding the IUD  ( I am hoping he is really joking).   
 
So there is the condensed version of the roller coaster ride that has been our lives for the last two weeks.  Right now we are taking things day by day and are forever grateful that God has chosen us to bring another beautiful life into this world. 
Here is the most recent shot of BW2 --- with his/her tiny leg kicking up in the air!


Tuesday, April 16, 2013

Babe in a Mug

Dad is out of town and Birdie has been having a particularly rough week, deciding she doesn't care much for sleep anymore, but she does love to poop on every outfit I put her in.  Especially at daycare and Mimi's house.  So I have been dragging.  Literally dragging.  But even at her worst she always makes me smile.  In fact, most of the time she cracks me up.  Especially when she is in a coffee mug....

One of our favorite blogs is Mommy Shorts.  It's hilarious, her kids are adorable, it lets me dream about mommyhood in the big city, and it never fails to cheer me up.  This week she posted pics of her adorable kiddos in her signature Mommy Shorts mug. 


No photoshop required, just the babe and a mug.  You don't even need to be creative.  My mom and I were cracking up taking pictures of Little Bird.  You can take your own pic of your babe and tag them #babeinamug on Instagram.

We were super excited to see that she featured Jaz and some other mug cuties on her blog this week! 


#babeinamug #meanmuggin


So tonight at 2 AM after you've snuggled your little monster back to sleep for the 5th time, pop on over to MommyShorts and crack up at all the other crazy, sleep deprived parents who are putting their babes in kitchenware for their own personal entertainment. 

Thursday, March 7, 2013

DIY Taggie Teether Blanket

Miss Birdie is starting to show interest in playing and toys ~ she loves to lie on the floor and kick and squawk and squeal.  So far the only toys she really loves are her taggie blankets and teether blankets. They are soft, they make a lovely crinkly noise she is particularly fond of, and she can squish them up just enough to shove them in her mouth.  She is in heaven.


The design of these little blankies are pretty simple, and I recently taught myself to sew, so I thought, Hey! I can make those!  And I bet I can make them super cute and pink and girlie.  Light Bulb. 

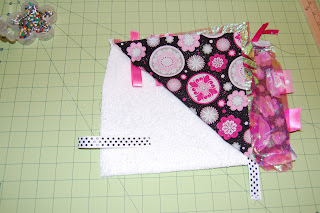
So I grabbed some ribbon and fabric and got to work.  Here is what I came up with.


And she loves it!  It may not be as perfect as the store bought kind and the stitches might be a little crooked but her momma made it just for her <3


Here's how I did it:

You wil need:
Fabric
A towel or terry cloth
Ribbon (various colors, textures, sizes)
Mylar gift basket wrap (Crinkle paper)
Sewing machine and thread

**Create, Craft, Conserve Tip:  If your a DIY junkie like me, use whatever supplies you have already around.  I didn't have to purchase anything for this project.  Your kid is literally going to cover it in spit up and slobber anyways.

1) Pick your fabric and ribbon.  Grab some crinkly paper out of your gift wrap stash.


2)Measure your fabric, terry cloth, and crinkle paper to your desired size.  I made mine 9x6.  I plan on making her a round one soon ---you can choose any size or shape. 

I find it easier to lay all three pieces of fabric I'm working with down on my cutting mat, make sure they are even, and cut through all three at once.  Cutting anything is my major craft flaw. I don't know how I ever passed first grade art.  I should still be using safety scissors.


3) Cut your ribbon to the desired length.  You need to make sure you cut pieces long enough to double.  However long you want the ribbon hanging out of the blanket, double it.  My pieces are approx 4 inches long and stick out of the finished project 2 inches. 


4) Pin your 3 pieces of material together.  We are sewing from the inside out, so your middle piece of material is on top (the crinkle paper), followed by the top print, and the bottom terry cloth.  The right side of your print fabric (the side you want to show on your blanket) should face the right side of the towel.  Once you have sewn the blanket, you flip it inside out and the pretty sides of your material will show.  Sewing this way also helps hide flaws in the stitches, which if your anything like me, you will have. 

          
5)  Fold your ribbon in half, and stick in between the pins in your fabric.  You can space your ribbons however far apart you like and you can have as many or as few ribbons as you wish.  I put more on the longer sides of the blanket.

Here's what it looks like from the inside.


6) Now that everything is in place, start sewing!  I use a basic stitch all the way around the blanket, leaving a 3-4 inch gap to flip the blanket right side out after sewing.  The crinkle paper is delicate but I had no problems with it tearing while I stitched. 

You also have two options regarding securing the ribbons.  I add another top stitch to my blanket after it is turned right side out to give it a finished edge.  This gives me two strong lines of stitches over each ribbon.  If you don't want to top stitch your blanket, I suggest you back stitch over every ribbon to secure it.  You don't want your little one pulling out a ribbon that isn't secure in the blanket.


7) Once you have sewn all the way around the blanket, turn it right side out using the hole you left. 


8) Use a pen or other tool to poke out the corners.


Here is the small gap you left to turn your blanket right side out.  You can hand stitch this hole closed now and call it quits or you can top stitch the entire blanket to give it a finished edge.


9)Now your blanket is turned out correctly and you need to close the gap you left. Tuck the edges of the fabric into the opening to create an even edge and place back under your machines presser foot. Sew  another basic stitch around the outer edge of your entire blanket.


Ta-da!  Handmade (with love I might add) Taggie Teether blanket.  A big hit with the little bird <3


Sunday, February 10, 2013

Showering Baby Oliver

My beautiful cousin Jennifer is expecting her third boy this Spring, and we all gathered today to shower her and baby Oliver! We can't wait to cuddle him and we know he will be just as gorgeous as his big brothers!

My mom and I have thrown lots of showers but this was the first we have ever hosted at our home, so it was a little different but I really enjoyed the laid back atmosphere. We went with a vintage toy theme and I think it turned out very cute! 


Wednesday, February 6, 2013

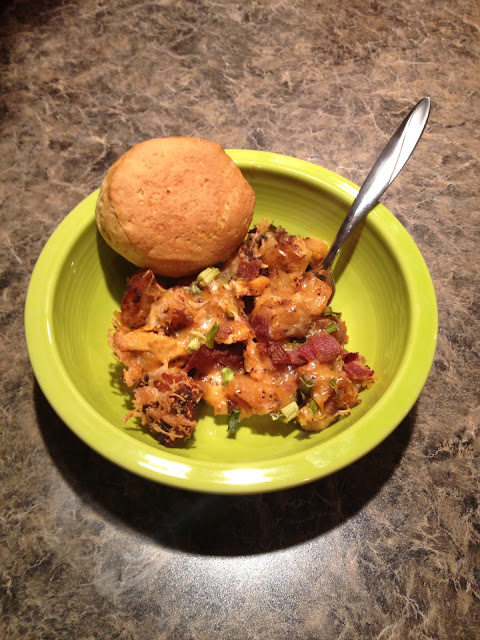
Buffalo Chicken Baked Potato Casserole

So Pintrest is awesome.  I've snagged tons of cute ideas off there this year and ended up with some great gifts and decor around the house, and in light of my success I decided to start trying some recipes.  It seems like we eat the same 4 meals over and over.  So I browsed Pintrest for hours and pinned the ones that looked worthy of my time and our picky eating habits.  My first attempt was "The World's Best Pork chops".  Sounds good enough.  WRONG.  A better name for these would have been "Are You Sure That Was a Pork chop?"  Total Pinstrosity.  Attempt number two, however, was a total success. Enter Buffalo Chicken Baked Potato Casserole.


This is seriously the most delicious casserole ever.  And who even likes casseroles?  The original pin came from Cook Lisa Cook but I down-sized it a little to make it more manageable for my small family. Either way, it is easy to half or double for however many your serving.

You will need: 
  • 1 lbs boneless, skinless chicken breasts, cubed
  • 6 medium potatoes, cubed
  • 1/3 cup olive oil
  • 1 tsp. salt
  • 1 TBS. freshly ground pepper
  • 1 TBS. paprika 
  • 2 TBS. garlic powder
  • 6 TBS. hot sauce  ( I use Franks Buffalo Sauce)
  • 1 bag Fiesta Blend Cheese or shredded cheese of your choice.
  • 1 c. crumbled bacon
  • 1 c diced green onion

Preheat oven to 450 degrees. 
Spray a 9x13 baking dish with cooking spray.
Cube your potatoes and chicken.  Make the pieces similar in size.


In a large bowl mix together the olive oil, salt, pepper, paprika, garlic powder & hot sauce.


Add the cubed potatoes and stir to coat. 


Scoop your coated potatoes in your pan, leaving behind as much of the marinade as possible. 
Bake the potatoes for 45-50 minutes, stirring every 15 minutes, until crispy & brown on the outside.
 
While your potatoes are cooking, add the cubed chicken to the bowl with the leftover marinade and stir to coat. Put in the fridge.


Once the potatoes are fully cooked, remove from the oven and lower the oven temperature to 400 degrees.  
 Add your marinated chicken to the cooked potatoes.


  Top your entire casserole with the shredded cheese, bacon, and green onions.


Stick the casserole back in the oven and bake for 15- 20 minutes or until the chicken is cooked through and the topping is bubbly.  Serve with ranch or blue cheese.


** If hot sauce isn't your thing or you want to serve to younger kids, other chefs have used their favorite BBQ sauce as the marinade. 


Friday, February 1, 2013

It's Go Time - What to Pack

Sometime during your insane pregnancy nesting period you will pack a hospital bag.  If your anything like me you will pack and repack it 9 times after you read every singe blog and pin related to packing a hospital bag.  So I thought I would share what I ended up with when the time actually came.  If your having a home birth --God Bless You, your a total superstar and I'm jealous - feel free to move on to the next post.

First of all, its a good idea to pack your bag and the baby's bag at least a few weeks before your due date.  I packed mine at 35 weeks, was put of bed rest at 37 weeks, then didn't have the baby until 41 weeks.  Excruciating.  Oh well, at least I was prepared.

It's also a good idea to tell your significant other/birth support where the bags are.  I went into labor at my parents while we were watching The Grinch.  I was literally wearing pj pants and a Smurfs shirt circa 1982.  My husband had to load all the bags, pillows, blankets ect... and then come and pick me and my mom up.  After I changed my clothes of course...

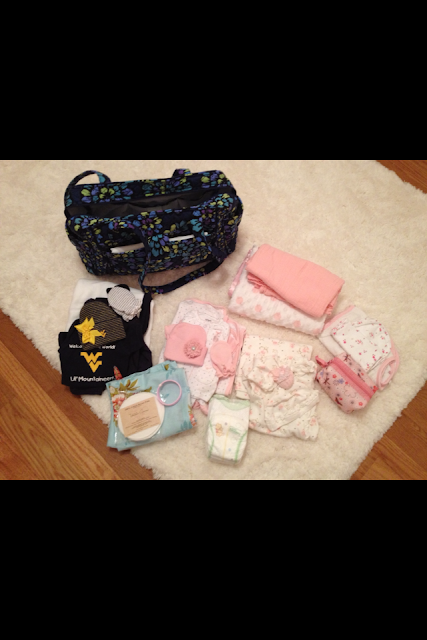
Step 1:  Get adorable bags.  No, you don't need them.  You could take your stuff in a garbage bag and after the baby is here you could care less.  BUT before all this goes down, while your 19 months pregnant and puffy, buying super cute bags will make you feel better. 


YOUR BAG:


While birthing, you honestly don't need much.  Your vagina and some willpower. Post-partum is where it gets messy.  Literally. 

1) Underwear:  I packed was about 10 pairs of ginormous boy short underwear that I could throw away afterwards.  The hospital will of course give you mesh panties but they weren't supportive enough for me. My best friend swears by them.  Take a couple of your own just in case.

2) Pads:  I took some maxi pads but this is really unnecessary.  The pads you buy at the store don't stand a chance against the bleeding in the first few days.  Use what the hospital gives you and make sure you have a major supply of pads for when you get home.

3)  Slippers, slipper socks, and flip flops:  One for the room and one for the shower. Hospitals are gross.  DO NOT go barefoot.   

4) Bras.  I took two sports bras because I didn't have nursing bras yet.  My boobs didn't grow during pregnancy so I couldn't order any ahead of time.  If yours do, take your nursing bras.  Your boobs will hurt and your going to want some support for those girls.

5) Hospital clothes:  By all means you can stay in the gown the hospital gives you for your entire stay.  I felt ridiculous not having pants on when there were 13 people in the room.  So I brought some clothes.  I brought two nursing gowns, a pair of pjs, and a robe.  I highly recommend the robe.  I also had to stay in the hospital for 4 days -- oy vey--so I ran out of clothes and the hubs had to run home to get me more. 

6) Going home clothes:  Again, extra extra roomy nursing tank, sweats, and jacket. Your not going to win any beauty contests here ladies.  And heads up, those people who tell you they fit into their pre-pregnancy jeans the day they left the hospital are lying. 

7)  Miscellaneous:  Iphone, Ipad, chargers, camera, snacks, blanket and pillow.  This is important.  If your breastfeeding you will be up at 3AM and you will need something to do because let me tell you there is nothing on TV.  And of course you will want to share all those pictures of your new little squishy with the Facebook world.  I also thought I was going to starve to death the entire time I was in the hospital. I'm a picky eater and a nurse, so I don't mix well with hospital food.  The physical exhaustion from labor coupled with the extra energy require to breast feed made me ravenous.  My husband could not keep enough snacks in the room. Other people have told me they couldn't eat anything, so I guess it can go either way.  I also took my own blankets and pillows ( again the nurse in me showing through).  Hospital beds are hard.  And plastic.  Hospital pillows are plastic.  You've been warned. 

TOILETRIES:


This can really vary for everyone so I'll just give you a brief run down of what I took.  It actually worked out pretty well for me.

1) Deodorant. Duh.
2) Travel size shampoo and conditioner.
3) Travel size lotion and hand products.
4) Breast pads and lanolin (the hospital will give you these too).
5) Toothbrush, toothpaste, mouthwash.
6) Tucks pads and squirt bottle.
7) Make-up removing wipes
8) A little make-up.  I did mascara.  Your going to be in a lot of pictures.
9) Tons of hair bands.  I always lose those.
10) Chap stick.  I can't explain why but your lips get so dry during labor.  A must have.

BABY'S BAG:


This one is much more fun to pack.  Honestly, your kid doesn't really need anything while in the hospital but you.  So if you like to pack light, take a cute outfit for discharge day and call it good.  If your like me though, and can't wait another second to get a pretty pink bow on your new bundle you can pack a small bag.  Mine worked out perfect for me, I ended up with just what I needed.

1) Nursing cover if your breast feeding.  Lots of people in your room ALLLL the time. I also took some cloth breast pads and a nursing bracelet but didn't use either. 
2) Thick blanket if its cold out.
3) At least one receiving blanket. The hospital has tons of these but you will want a cute one in some of your pictures.
4) Burp cloths.  Also hospital supplied but I took some pink ones.
5) Clothes:  The hospital puts baby in those little white side button shirts which are adorable and make for easy access for the doctors and nurses.  But you have a whole closet full of clothes, right  And you can't wait  to use them.  The nurses love seeing the babes in their little outfits so bring as many as you want. After all it's your kid.  But also know its 100%  OK to leave them in the hospital shirts until you go home.  I took two gowns for the baby to sleep in and three outfits.  Each outfit included a matching hat, mittens, socks, and receiving blanket.  I know, over kill.  But she looked sooo adorable!  Until she had to lie naked under the bili lights for 24 hours.  Not fun.  You will want at least one cute outfit for hospital pictures.  Which reminds me, I need to order those things. 
6) Nursing Pillow:  Because nursing is hard, and your tired, and these things are a God send. 
7) Car Seat.  Gotta get that bambino home somehow!

Things you don't need to take for baby:  Diapers, wipes, lotion, brush, comb, nasal aspirator,baby wash, ect...  The hospital has all this and will give you tons.  Use it.  Then take the rest home with you and use it there.  Babies are expensive and you can use all the free stuff you can get. 

**Here are some other things I didn't take but others recommend:  Lozenges, cough drops, paper and pen, sleep mask, baby book, your own towels, address/phone book, pacifiers, special stuffed animal for baby, hand sanitizer, outfit for big brother/sister.

But don't just take my word for it!  Check out these other blogs that helped me decide what to take for the big day!

Monday, January 28, 2013

DYI Quilt Hoop Wall Decor

This project is super easy and cheap, but looks so awesome up on the wall.


This is the wall art I have in one of our spare bedrooms.  Our guest room currently houses my closet, my dresser, and a spare bed.  I prepared the room as a sort of mother-in-law quarters for my momma to come stay with me when Birdie was born.  Turns out that plan got scratched, but at least I now have a super cute guest room.  And my momma is still welcome to stay anytime!

You will need:

Quilt hoops
Fabric (at least one inch larger than your hoop)
Glue gun
Iron
Scissors
Hammer and nails


Create, Craft, Conserve Tip:  Use fabric scraps you have lying around, old concert or sports t-shirts, or sheets.  Look for lightly used quilt hoops at yard sales and Goodwill.  You can also spray paint your hoops before beginning if you don't like the natural wood look. 

1)  Iron your fabric.  This is an important step in getting a smooth surface and avoiding wrinkles in your final product.

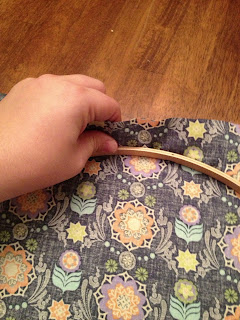
2)  Loosen the fastener at the top of the hoop and separate the two rings.  Lay your fabric over the outside hoop then press the inner hoop onto the fabric.  This sandwiches the fabric between the two hoops.  Tighten the fastener at the top of the hoop to hold the two hoops together securely.


Your hoop should now look like this.


4) Trim the fabric to approx. 1/2 inch all the way around the hoop. 


5) THIS IS THE MOST IMPORTANT STEP!  You want to pull your trimmed fabric taught on all sides of the hoop.  If you forget this step, the fabric will bunch and wrinkle, making the front of your hoop art uneven and bumpy. 


6) Almost done.  Last step!  Apply a thin layer of hot glue onto the inner hoop and press the extra fabric into the glue, towards the inside of your hoop.  The fastener on top of the hoop will keep the two hoops together.  The layer of hot glue will help keep your fabric tight and allow the hoop to lie flat against the wall.


~ Ta-Da! ~


The finished product
 
Using an old concert t-shirt


Use different sizes and shapes for an eclectic look.