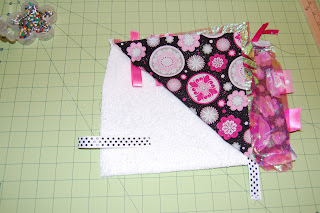
The design of these little blankies are pretty simple, and I recently taught myself to sew, so I thought, Hey! I can make those! And I bet I can make them super cute and pink and girlie. Light Bulb.
So I grabbed some ribbon and fabric and got to work. Here is what I came up with.
And she loves it! It may not be as perfect as the store bought kind and the stitches might be a little crooked but her momma made it just for her <3
Here's how I did it:
You wil need:
Fabric
A towel or terry cloth
Ribbon (various colors, textures, sizes)
Mylar gift basket wrap (Crinkle paper)
Sewing machine and thread
**Create, Craft, Conserve Tip: If your a DIY junkie like me, use whatever supplies you have already around. I didn't have to purchase anything for this project. Your kid is literally going to cover it in spit up and slobber anyways.
1) Pick your fabric and ribbon. Grab some crinkly paper out of your gift wrap stash.

2)Measure your fabric, terry cloth, and crinkle paper to your desired size. I made mine 9x6. I plan on making her a round one soon ---you can choose any size or shape.
I find it easier to lay all three pieces of fabric I'm working with down on my cutting mat, make sure they are even, and cut through all three at once. Cutting anything is my major craft flaw. I don't know how I ever passed first grade art. I should still be using safety scissors.
3) Cut your ribbon to the desired length. You need to make sure you cut pieces long enough to double. However long you want the ribbon hanging out of the blanket, double it. My pieces are approx 4 inches long and stick out of the finished project 2 inches.
4) Pin your 3 pieces of material together. We are sewing from the inside out, so your middle piece of material is on top (the crinkle paper), followed by the top print, and the bottom terry cloth. The right side of your print fabric (the side you want to show on your blanket) should face the right side of the towel. Once you have sewn the blanket, you flip it inside out and the pretty sides of your material will show. Sewing this way also helps hide flaws in the stitches, which if your anything like me, you will have.
5) Fold your ribbon in half, and stick in between the pins in your fabric. You can space your ribbons however far apart you like and you can have as many or as few ribbons as you wish. I put more on the longer sides of the blanket.
Here's what it looks like from the inside.
6) Now that everything is in place, start sewing! I use a basic stitch all the way around the blanket, leaving a 3-4 inch gap to flip the blanket right side out after sewing. The crinkle paper is delicate but I had no problems with it tearing while I stitched.
You also have two options regarding securing the ribbons. I add another top stitch to my blanket after it is turned right side out to give it a finished edge. This gives me two strong lines of stitches over each ribbon. If you don't want to top stitch your blanket, I suggest you back stitch over every ribbon to secure it. You don't want your little one pulling out a ribbon that isn't secure in the blanket.

7) Once you have sewn all the way around the blanket, turn it right side out using the hole you left.
8) Use a pen or other tool to poke out the corners.
Here is the small gap you left to turn your blanket right side out. You can hand stitch this hole closed now and call it quits or you can top stitch the entire blanket to give it a finished edge.
9)Now your blanket is turned out correctly and you need to close the gap you left. Tuck the edges of the fabric into the opening to create an even edge and place back under your machines presser foot. Sew another basic stitch around the outer edge of your entire blanket.
Ta-da! Handmade (with love I might add) Taggie Teether blanket. A big hit with the little bird <3


No comments:
Post a Comment